Hitbox
An optional package that enables the attaching of interaction information to a drop target.This package depends on the core package.
This package has no dependency on any view library (eg react), or on the Atlassian Design System.
- List item: Determines that operation (
"reorder-above","combine"or"reorder-below") that should be applied to a vertical or horizontal list item (including trees) - Closest edge: Detects the closest edge (
"top", "right", "bottom", "left") for a drop target being dragged over. - Tree item: (Please now use list item) Determines the operation
(
"reorder-above", "reorder-below", "make-child", "reparent") to be performed when when a tree item is dropped.
List item
The list item hitbox has been designed to provide rich hitbox information for experiences where items are ordered after each other. The list item hitbox can also be used in nested structures such as trees (you can think of each level of a tree as a separate list).
The list item hitbox allows an item to support up to three separate outcomes:
"reorder-before""reorder-after""combine"
Each operation has three possible values:
"not-available"(default)"available""blocked"(similar to"available", but generally used to show warning colors)
type Operation = 'reorder-before' | 'reorder-after' | 'combine';
// an `Instruction` contains the applied operation, and whether the operation was blocked.
type Instruction = {
// What the operation is
operation: Operation;
// whether or not the operation was "blocked"
blocked: boolean;
};import {
attachInstruction,
extractInstruction,
type Instruction,
} from '@atlaskit/pragmatic-drag-and-drop-hitbox/list-item';
dropTargetForElements({
element: myElement,
getData: ({ input, element }) => {
// your base data you want to attach to the drop target
const data = {
itemId: 'A',
};
// this will 'attach' the closest edge to your `data` object
return attachInstruction(data, {
input,
element,
operations: {
'reorder-before': 'available',
'reorder-after': 'available',
combine: 'available',
},
});
},
onDrop: (args) => {
const instruction: Instruction | null = extractInstruction(args.self.data);
},
});Behaviour
The hitbox for an item will automatically adjust based on which items are available or blocked:
All operations are available
- before start edge:
"reorder-before" - first 1/4:
"reorder-before" - middle 1/2:
"combine" - last 1/4:
"reorder-after" - after end edge:
"reorder-after"
Only "reorder-before" and "reorder-after" are available:
- before start edge:
"reorder-before" - first 1/2
"reorder-before" - last 1/2:
"reorder-after" - after end edge:
"reorder-after"
Only "reorder-before" and "combine" are available:
- before start edge:
"reorder-before" - first 1/4:
"reorder-before" - middle 3/4:
"combine" - after end edge:
"combine"
Only "reorder-after" and "combine" are available:
- before start edge:
"combine" - first 3/4:
"combine" - last 1/4:
"reorder-after" - after end edge:
"combine"
Only one operation is available (eg "combine"):
- before start edge:
"combine" - in item:
"combine" - after end edge:
"combine"
No available (or blocked) operations:
- before start edge:
Instructionwill benull - in item:
Instructionwill benull - after end edge:
Instructionwill benull
Preventing operations
If you don't want a particular operation to be available, you can the operation to
"not-available", or just leave it blank (the default value is "not-available"). The hitbox will
automatically adjust to account for which operations are available.
return attachInstruction(data, {
    input,
    element,
    operations: {
        'reorder-before': 'available',
        'reorder-after': 'not-available', // reordering after no longer available
    },
});
Blocking operations
Sometimes you want to explicitly call out that an operation is not permitted right now. An example
of this is draft pages in Confluence which cannot be the target of a drag operation, but once page
is no longer a draft it could be the target of a drag operation. In these cases, it can be helpful
to make it explicit to the user that a particular drag operation can not permitted. You can use
blocked for this use case. When an operation is blocked, it will be used by our drop indicator
to show a drop indicator with a warning color.
return attachInstruction(data, {
    input,
    element,
    operations: {
        combine: 'blocked',
    },
});
Vertical and horizontal support
You can use the list item hitbox for vertical or horizontal lists. You need to provide which axis
the interface is on to attachInstruction. The axis value can be "vertical" (default) or
"horizontal".
return attachInstruction(data, {
    input,
    element,
    axis: 'horizontal', // "vertical" is the default
    operations: {
        'reorder-before': 'available',
        'reorder-after': 'available',
    },
});
Trees
The list item hitbox has been designed to work well with tree structures, as you can see in our tree example.
Some high level notes when building trees:
- You can treat each level of the tree as a separate "list"
- You can enable whatever operations you like
- For expanded tree items, do not allow
"reorder-after"operations
Utilities
There are no utilities specific for our list item hitbox, as it can contain non-reordering
operations (eg "combine") which require more decisions to be made regarding what the state update
could look like. For "reorder-before" and "reorder-after" operations, you can use our general
purpose reorder utility.
Closest edge
The closest edge addon is used to know what the closest edge is when dragging over a drop target.
Knowing the closest edge can be helpful when doing reordering and moving operations. This addon
leverages the fact that getData() is repeatedly called throughout a drag and drop operation.
The attachClosestEdge() function adds a unique Symbol to your drop target's data object, which
allows for type safe lookups with extractClosestEdge().
type Edge = 'top' | 'right' | 'bottom' | 'left';import {
attachClosestEdge,
extractClosestEdge,
Edge,
} from '@atlaskit/pragmatic-drag-and-drop-hitbox/closest-edge';
dropTargetForElements({
element: myElement,
getData: ({ input, element }) => {
// your base data you want to attach to the drop target
const data = {
itemId: 'A',
};
// this will 'attach' the closest edge to your `data` object
return attachClosestEdge(data, {
input,
element,
// you can specify what edges you want to allow the user to be closest to
allowedEdges: ['top', 'bottom'],
});
},
onDrop: (args) => {
const closestEdgeOfTarget: Edge | null = extractClosestEdge(args.self.data);
},
});Utilities
Utilities specifically to make working with edges easier.
getReorderDestinationIndex
When you are rendering drop indicators (eg lines) between items in a list, it can be difficult to
know what the index the dropped item should go into. The final index will depend on what the
closest Edge is. getReorderDestinationIndex can give you the final index for a reordering
operation, taking into account which Edge is closest
import { getReorderDestinationIndex } from '@atlaskit/pragmatic-drag-and-drop-hitbox/util/get-reorder-destination-index';

// Dragging A on the left of B
// A should stay in the same spot
expect(
    getReorderDestinationIndex({
        // list: ['A', 'B', 'C'],
        // move A to left of B
        startIndex: 0,
        indexOfTarget: 1,
        closestEdgeOfTarget: 'left',
        axis: 'horizontal',
    }),
    // results in no change: ['A', 'B', 'C']
).toEqual(0);

// Dragging A on the right of B
// A should go after B
expect(
    getReorderDestinationIndex({
        // list: ['A', 'B', 'C'],
        // move A to right of B
        startIndex: 0,
        indexOfTarget: 1,
        closestEdgeOfTarget: 'right',
        axis: 'horizontal',
    }),
    // A moved forward ['B', 'A', 'C']
).toEqual(1);
reorderWithEdge
Performs an array reorder operation that takes into account the closest Edge. reorderWithEdge
uses getReorderDestinationIndex internally as well as reorder to reorder the array
(@atlaskit/pragmatic-drag-and-drop/reorder)
import { reorderWithEdge } from '@atlaskit/pragmatic-drag-and-drop-hitbox/util/reorder-with-edge';

// Dragging A on the left of B
// A should stay in the same spot
expect(
    reorderWithEdge({
        list: ['A', 'B', 'C'],
        // move A to left of B
        startIndex: 0,
        indexOfTarget: 1,
        closestEdgeOfTarget: 'left',
        axis: 'horizontal',
    }),
    // results in no change
).toEqual(['A', 'B', 'C']);

// Dragging A on the right of B
// A should go after B
expect(
    reorderWithEdge({
        list: ['A', 'B', 'C'],
        startIndex: 0,
        indexOfTarget: 1,
        closestEdgeOfTarget: 'right',
        axis: 'horizontal',
    }),
).toEqual(['B', 'A', 'C']);
Tree item
Please use our new list-item hitbox, which is a more flexible version of tree-item,
and can be used in tree structures.
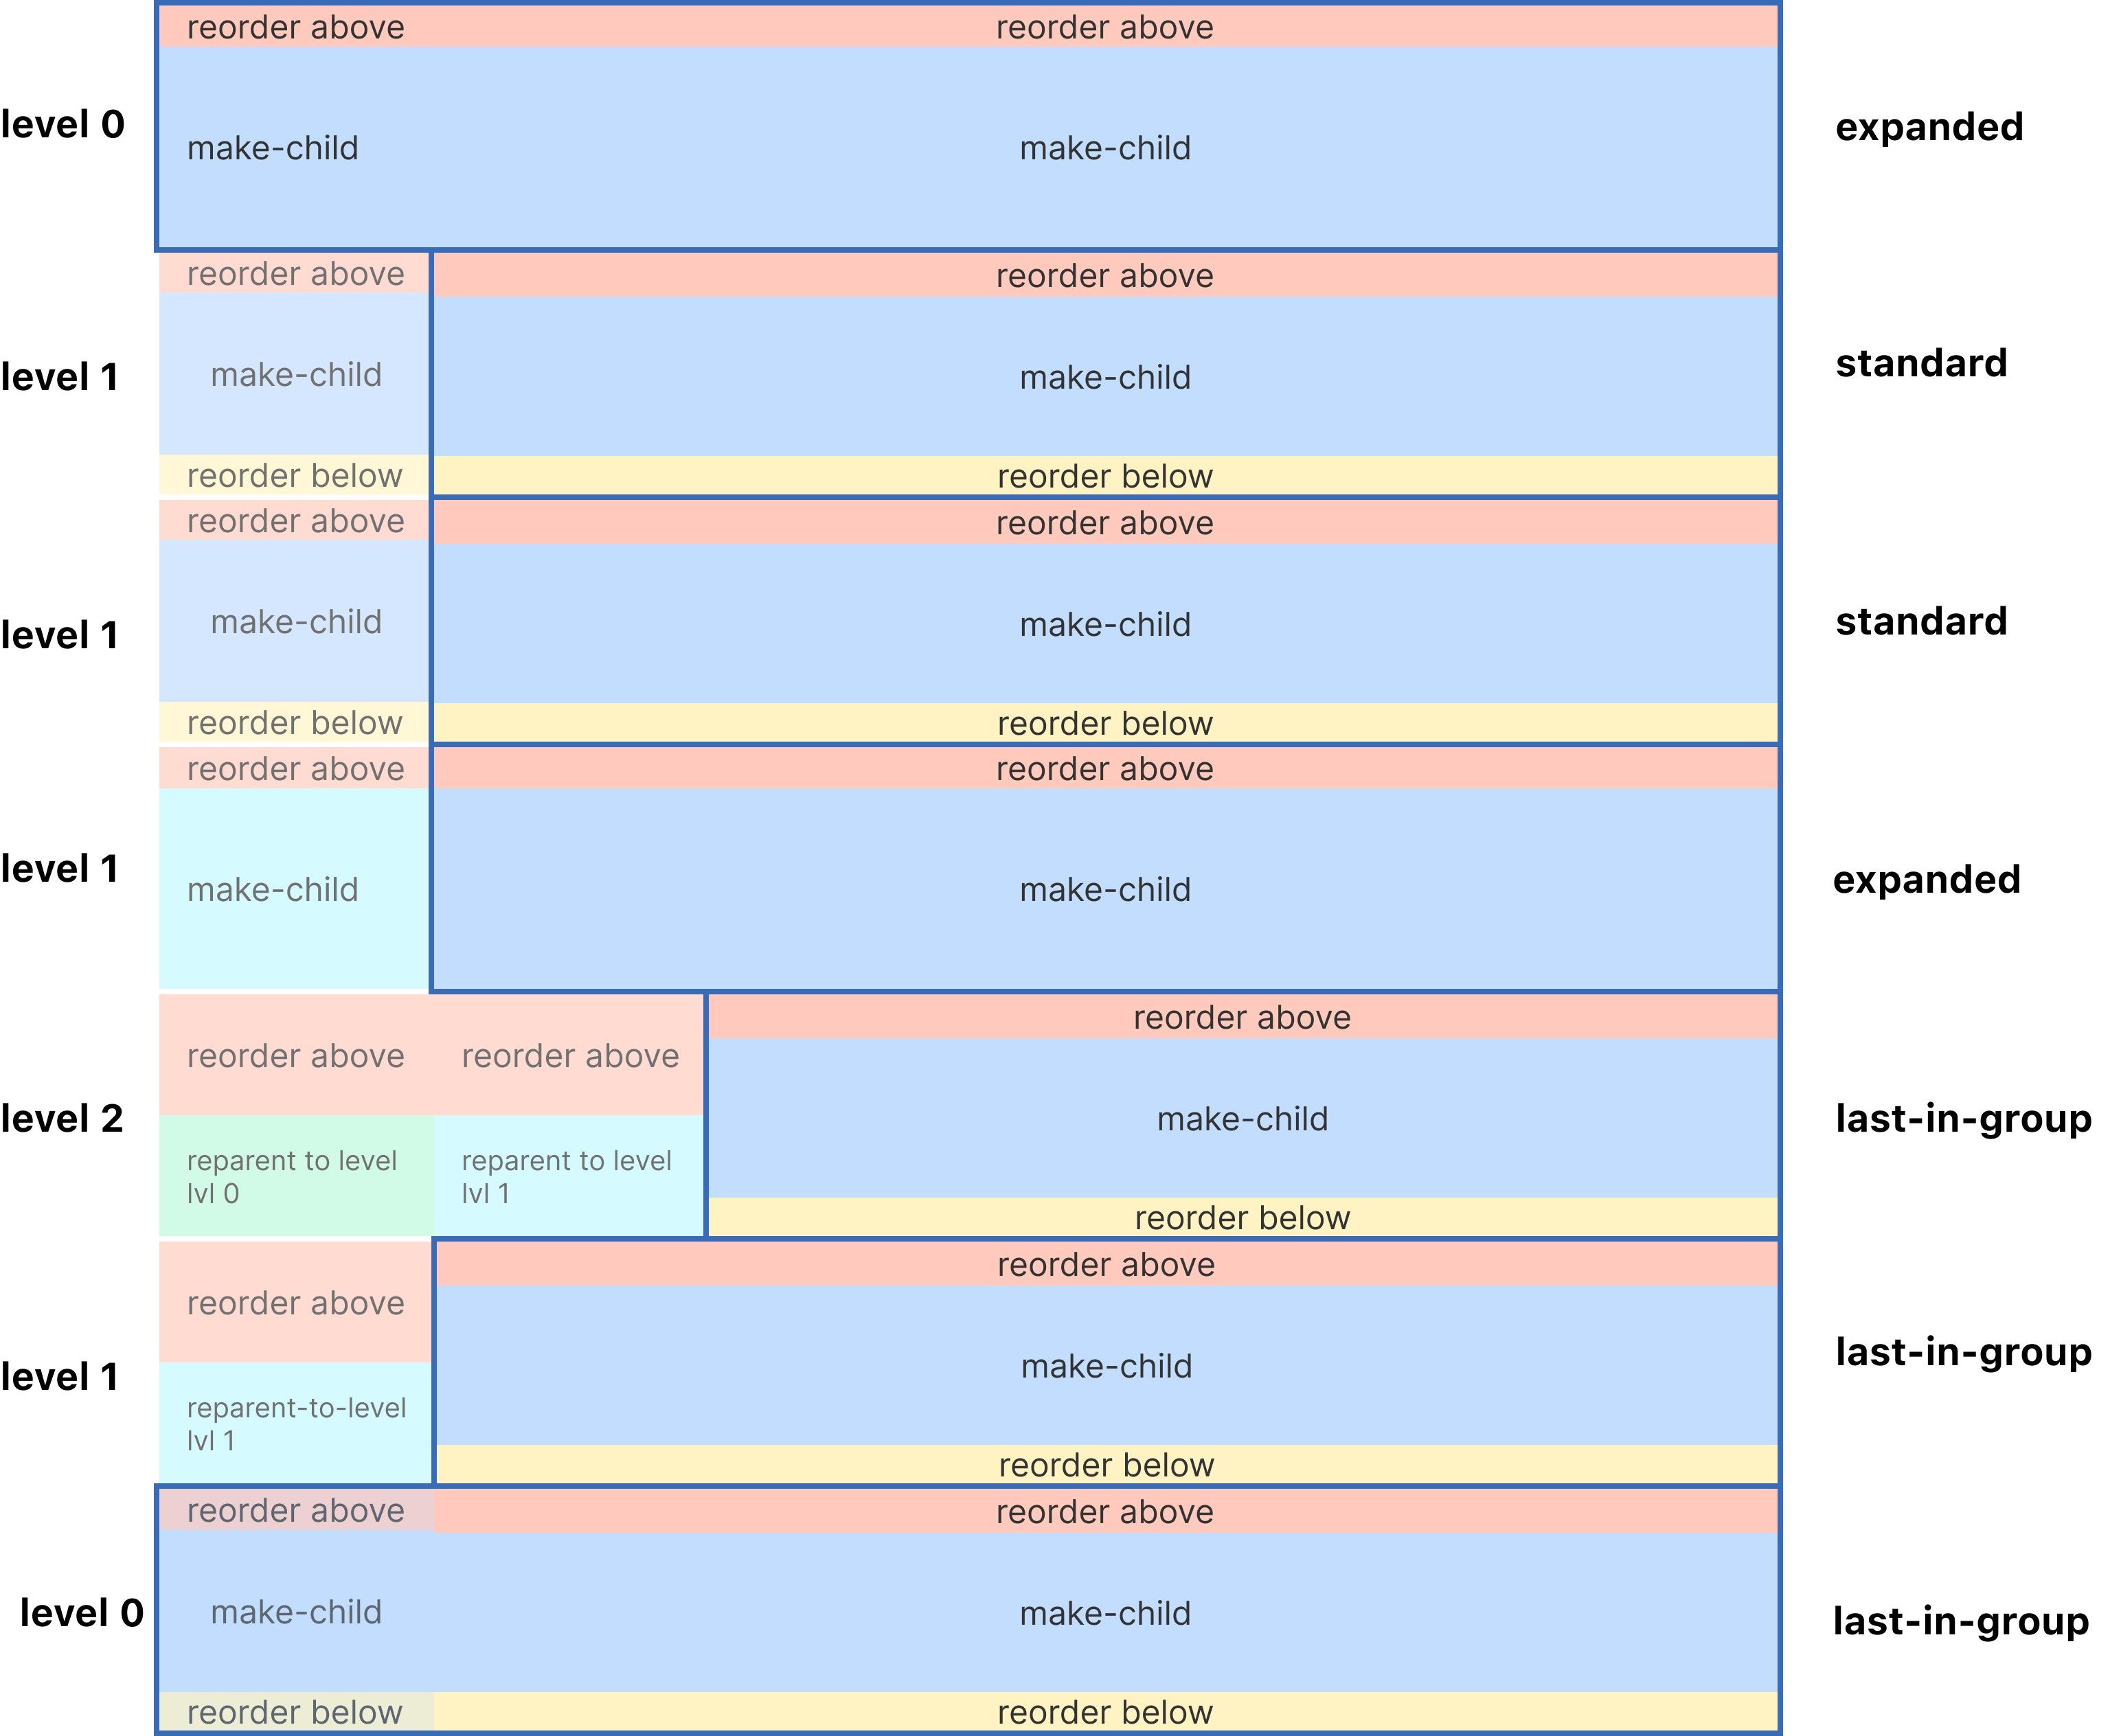
The tree item addon is used to know what operation should be performed when a tree item is dropped. The possible drag operations are:
- reorder-above: the draggable item should be moved above the item it's dropped on.
- reorder-below: the draggable item should be moved below the item it's dropped on.
- make-child: the draggable item should be made a child of the item it's dropped on.
- reparent: the level of the draggable item should change to a parent of the item it's dropped on.
Any drag operation can also be blocked.
Along with the drag position, the current level and the mode of the tree item being dragged over are used to determine the drag operation that should be performed. Below is a visual example of a tree hitbox demonstrating this:
The attachInstruction() function adds a unique Symbol to your drop target's data object, which
allows for type safe lookups with extractInstruction(). This addon leverages the fact that
getData() is repeatedly called throughout a drag and drop operation.
type ItemMode = 'standard' | 'expanded' | 'last-in-group';type Instruction =
| {
type: 'reorder-above';
currentLevel: number;
indentPerLevel: number;
}
| {
type: 'reorder-below';
currentLevel: number;
indentPerLevel: number;
}
| {
type: 'make-child';
currentLevel: number;
indentPerLevel: number;
}
| {
type: 'reparent';
currentLevel: number;
indentPerLevel: number;
desiredLevel: number;
}
| {
type: 'instruction-blocked';
desired: Exclude<Instruction, { type: 'instruction-blocked' }>;
};import {
attachInstruction,
extractInstruction,
Instruction,
} from '@atlaskit/pragmatic-drag-and-drop-hitbox/tree-item';
dropTargetForElements({
element: myElement,
getData: ({ input, element }) => {
// your base data you want to attach to the drop target
const data = {
itemId: 'A',
};
// this will 'attach' the instruction to your `data` object
return attachInstruction(data, {
input,
element,
currentLevel: 2,
indentPerLevel: 20,
mode: 'standard',
// you can specify instructions to block
block: ['reorder-below'],
});
},
onDrag: (args) => {
const instruction: Instruction | null = extractInstruction(args.self.data);
},
});